Various complex weaving has lost its popularity, however, some of them still flash as the basis, and as a decorative element for elegant evening styling. For example, a graceful rose from hair, eye-catching, can look very impressive if it is the main decoration of the whole image, not arguing with the rest of the details. How to do it yourself?
FAST ARTICLE NAVIGATION
Classic hair flower technology
Before trying to repeat this hairstyle in a video or photo lesson, you should pay attention to some nuances that determine the success of the event:
- First, the requirement for length - curls should reach the shoulder blades or descend a little lower, because it is this that determines the pomp of the finished flower and the number of its petals. But density does not play a special role, since the details are drawn out, becoming flat and wide.
- Secondly, it is recommended to work not on a freshly washed headotherwise the hairs will crumble in the hands and keep the shape very bad. Or, if there is a need to refresh the roots, be sure to choose a natural fixation mousse for the main web - a strong one will give unwanted bonding.

Auxiliary tools and accessories - hairpins and stealth in large quantities, gum (preferably with hooks), a thin hairbrush for partings with a knitting needle, clamps, ducks without teeth, good fixation varnish. Before starting work, it is recommended that you familiarize yourself with the training videos in order to accurately track the direction of movement and the position of the hands.

- Scrape the entire mass of hair back, in the middle, just below the upper point of the ear, pull it into a tail: the choice of the area is very important, because it determines how attractive and harmonious your rose will look from the hair. Lowering it too low (on the back of the head) is not worth it if you do not plan to place it on the side. Highly, it looks spectacular only as a fine detail of another hairstyle, which will be discussed later in more detail.
- In the upper part of the tail, select a sufficiently wide (1.5-2 cm) strand, add along the entire length, lightly smooth with natural bristles and treat with varnish. Do not pour - just sprinkle and smooth again. After that, wind it around the index finger, forming a snail, place it over the rubber band and remove it from the finger. To keep the form unchanged, fix it with invisible heads. This will be the center of the rose from the hair.
- Now comes the turn of the petals, they will be created on the same principle, so if you understand how to do the first, you will be able to cope with the rest. Movement occurs from the center in a spiral outward. Separate the new strand from the tail (again up to 2 cm) under the previous one, smooth with a natural nap and treat with varnish. At the very base, pick up the strand with a clamp-duck, guiding its end inward, and laying the strand itself flat, so that it looks upwards and is perfectly stretched. Holding it flat to the head, swipe around the base (about half of its arc) and hide the tip under it, securing it with an invisible one.
- Just below the spent strand, separate the new part of the hair of the same width and lay it step by step according to the above algorithm, but hide the tip a little earlier: about 1-1.2 cm. Then you can work either with a spiral, continuing to add petals at the center, or finish completely with the left side and go to the right. Regardless of how you do this, do not forget that the parts of the hair to be separated should be the same width, and the size of the petals as it moves away from the core of the flower should become smaller.

After all the details have been laid out, you will need to make the final touches: carefully holding the place adjacent to the head, pull the outer edge (arc) petal, thereby expanding it.


Editorial Board
If you want to improve the condition of your hair, special attention should be paid to shampoos that you use.
A frightening figure - in 97% of shampoos of famous brands are substances that poison our body. The main components, due to which all the troubles on the labels are designated as sodium lauryl sulfate, sodium laureth sulfate, coco sulfate. These chemicals destroy the structure of the hair, the hair becomes brittle, lose elasticity and strength, the color fades. But the worst thing is that this stuff gets into the liver, heart, lungs, accumulates in the organs and can cause cancer.
We advise you to abandon the use of funds in which these substances are located. Recently, experts of our editorial staff conducted an analysis of sulfate-free shampoos, where the first place was taken by funds from the company Mulsan Cosmetic. The only manufacturer of all-natural cosmetics. All products are manufactured under strict quality control and certification systems.
We recommend to visit the official online store mulsan.ru. If you doubt the naturalness of your cosmetics, check the expiration date, it should not exceed one year of storage.
Recommendations and tricks from stylists
If there is a classic hairstyle rose from the hair, then there must be its modifications. Since the traditional look of this styling is completely collected strandsChanges often concern the presence of free mass. Thus, a flower can only be a small detail that adorns a large tuft or loose curls at the side, as well as a Greek braid and other styling based on curls.


- Classic rose - half closed, external petals are no longer lying on the surface of the head, but almost perpendicular to it. However, you can do the opposite version, with petals turned outward. To do this, after the formation of the core, work begins with external parts, gradually narrowing the circumference, respectively, the strands from the tail will be taken not from the center, but from the edge.
- Express options for such styling also exist: for example, you can lay out a flower and from braid. Divide the tail into 3 equal parts, braid each of them into a classic braid, the links of which must be carefully pulled sideways, flattened, and this will be the petals. Start each spit alternately twist the scroll with the cochlea at the base of the tail, fixing the invisible faces behind the inner sides of the links.

Finally, we suggest viewing educational videos that allow you to try different versions of the rose display. Some of the algorithms are so simple that they do not even require training.
In conclusion, it is worth noting that it is not very convenient to lay out a similar shape on very long curls, since the end that needs to be hidden adds extra volume. If it is too long, you can withdraw it from the opposite side after you finish the first petal, and make the same element, but mirror.
Flowers from baby hair. Hair "Rose of Hair": photos and step by step instructions
Beautiful long female hair is the owner's own decoration. Despite this, every girl wants to appear in an original way at parties, weddings, and any celebrations where she will be invited. The industry of fashionable style provides many possibilities and hairstyles that will satisfy any flirt. But it is not always possible to visit the master of the professional.
Many people try to learn how to make original hairstyles themselves, at home. This requires concentration, skill and dexterity of the fingers, but in the end, learning how to do her hair is the innate ability of every woman.
Fashion trends
The original trend of this year was the flowers made from their own strands. Of course, this is more an evening hairstyle, but it is quite possible to do it yourself, having a little practice in front of a mirror. In case of luck, a fantastic appearance is guaranteed, which will blow the people around.
Just a couple of years ago, it was fashionable to appear at a resort, a beach party, or at a pleasant town intertwyer with a flower in her hair. On the shelves of small and not very small shops there were hairpins and clips on which artificial flowers were attached. The fashion was called "Hawaiian", which implied imitation of free girls from these islands.
But today's fashion calls for a more professional approach to styling strands, which has been confirmed in new styles promoted from the TV screen. We will reveal some secrets of how to make a flower out of your own hair.
Flower on braids
This is a practical option, involving the ability of the girl to braid herself braids. Types of weaving a huge variety. Let us analyze how to make everyday hairstyle and create a flower out of hair on a braid.
You can start weaving from any part of the head, but first it is better to do it from the side, so that the sequence of actions is visible:

- We braid the usual three-strand braid,
- From any, arbitrarily chosen side of the braid, you need to slightly stretch the strand in each loop, creating a certain bulge,
- When the braid is docked, it should look fairly dense, on the one hand, and airy on the other,
- We fix the braid with an elastic band, preferably a thin silicone,
- We twist the braid spirally so that the convex part of the future “petals” remains on the outside,
- We pierce the resulting "rose" in the center with a hairpin, fixing it on the hair,
- It is also necessary to use a few stealth for better fixation, in addition you can spray the hair with lacquer,
- A hair flower is ready.
This type of weaving can be used daily, it is not necessary to wait for special events, especially since it will take very little time. There is a slightly more complicated option, involving an evening out at a serious event. If you can not visit the salon, then you will definitely need a girlfriend, ready to spend a couple of hours alone with you and your hair.
Evening exit
Clean, washed hair must be carefully combed. Divide the total mass of curls and form two horse tails - upper and lower. If the hair is straight, it is desirable to twist it on large or medium curlers to make it easier to lay out the hair.
We begin to work with the hair of the lower tail:

- Choose a curl that will be the core
- We treat it with lacquer, strong enough to fix and not correct the hairstyle later,
- We twist the curl around the finger, to the base of the tail, and fasten the first pin,
- Each subsequent strand is fixed in a similar way, with the amendment of the fact that you need to slightly pull the curl from the side, to give the flower a volume,
- After two, thus fixed locks, each next one needs to be wrapped around the middle of the flower, spreading carefully and spraying the structure with varnish,
- When the rose is ready, the upper tail can be dismissed and laid out around the hairstyle, or to create the effect of careless styling with the released curly knuckles.
Evening hairstyle rose is quite difficult to reproduce, but the flower from the hair will look elegant and sophisticated.
This technique is suitable, of course, only for owners of long hair. You can decorate this styling with a variety of studs with rhinestones or any accessories, but you need to make sure that everything looks harmonious. The chic should be in the very hairstyle, which will most effectively emphasize the well-groomed beauty of the hair.
As can be seen from the above methods of weaving technique, it can be simple or complex, but to create a flower from the hair you always need to spend time. Therefore, take care to allocate a sufficient amount of it for the construction of a masterpiece on your head.
Types of display
You can not only make a "rose", there are other techniques for recreating flowers on your head. Try to braid "daisy" to create a gentle romantic mood. This hairstyle is relevant for younger representatives of the female population. Curls should be long enough to ensure the beauty and creativity of appearance.
The outline of the hair hairstyle in this case will be less cumbersome than the previous one, but this will only add charm to the young fashionistas:

- To prepare the curls, you need to wash them, dry and use the iron to make it more smooth,
- Separating a small long strand, you need to make a loop, closer to the head, with a finger and secure with a rubber band,
- Throughout the remaining length of the strand, you need to repeat the manipulation, laying out the petals of the “chamomile” eight with respect to each other,
- There will be as many petals as your strand length allows.
This method is notable for the fact that it does not require studs or clips, it all rests on a single elastic band.
Sometimes it is very convenient, the hairstyle not weighed with accessories lasts much longer. In conclusion, it is worth mentioning that many stars of the world of cinema, like Kate Beckinsale, Scarlett Johanson, Nicole Kidman and similar beauty make the “rose” of hair.
Posing in front of the cameras, they can be sure that their hairstyle is in perfect order, emphasizes the irresistible, creates a high society image and is an example to emulate millions.
Going to a significant event, the girls think over their image to the smallest detail, selecting new and unusual hairstyles, so why not learn how to make a flower out of hair to become the queen of the party?
To do this, it is not necessary to contact a professional hairdresser, it is enough to make a little effort, to practice near the mirror and your head will be decorated with a luxurious flower. Today there are many variations in the performance of this hairstyle, but we consider the most affordable, which can be done independently.
Hair "Gentle lotus":
To create this flower you will need:
- elastic,
- foam and wax for styling,
- large curlers,
- invisible and studs
- original accessories,

So, wash your hair, apply the foam, dry. Then wind up on large curlers. Depending on the type and structure of the hair, select the optimal time for holding the curler on the head. On average, half an hour. Assemble the tail, fasten it with a rubber band. If you have bangs, it should be separated and left for subsequent installation. Divide the hair in the tail into several locks. Take one of them, wind it over the gum and fix it stealthily. As a result, you should have an odd number of strands in the tail that will act as petals for our lotus. The more petals you get, the more beautiful the flower will be. Gently grease each curl with wax, add a little at the base, and then gracefully wrap under the base of the tail and fix with pins. As an ornament for this hairstyle, artificial flowers, decorative hairpins, and other accessories would be very appropriate. Do not forget to sprinkle the resulting masterpiece varnish.

How to make hair "Flower"
So, you need to take the usual hair tie and thread it into the hairpin. Then gently collect the hair in the tail, sprinkle copiously with lacquer, fix with a prepared rubber band so that the hairpin is injected at the bottom of the tail. The finished tail should be divided into three parts. Two parts of the hair are fixed with hairpins, and the third, you need to pick up and slightly refresh the lacquer.
After that, this part of the hair is divided into three strands, which need to be carefully combed, slightly pulling, and braid into an ordinary, not too tight braid, trying to make it as flat as possible. The end of the braid is tightened with a thin, pharmaceutical gum.
After the pigtail is ready, on the right side of it you need to stretch the strands, moreover, so that you first grab the strand that is at the base of the tail, and then the strands that are below (and so on - up to the tip). By the way, the first order must be maximally stretched, the second - a little less, the third - even less, and so on, in descending order. And at the end of work - a drop of varnish.
In the same way you will need to process the remaining two parts of the hair.
When the braids are ready, take the tip of the right and turn to the ground in a circle. Visually, it should resemble an open flower, which needs to be properly fixed with studs. The next step is to wrap our middle oblique> clockwise and hide the tip, securing it with pins. We do the same with the last free braid. As a result, a large, exotic flower blooms on the back of the head.
The final touches - the laid braids are fixed with studs, and once again varnish. By the way, the hairstyle of the flower looks great with accessories in the form of a cluster of small flowers, located on the side of the outer braid or with studs decorated with rhinestones that will twinkle in braids like dew drops.
Any important event in the life of a girl is a reason to think about an unusual, original hairstyle that will attract the attention of everyone around you, surprising you with the beauty of the masterpiece and the complexity of the performance. Hairstyle flower from the hair just falls into the category of extravagant and non-standard styling of the century, striking in its ingenuity and luxurious appearance.
Flower masterpiece can be entirely created from the hair, or in harmony with other elements of hairdressing.
Secrets of openwork weaving
Dissolving the flower on the hair is not so easy, for this you need to have patience, enthusiasm and knowledge of some tricks.
Step 1. Separate the top strands from the hair and fasten them with several stealth, as shown in the photo. This will be the basis of the flower.
Step 2. Twist the strand into a bundle and roll it in a knot, fixing it with Invisibles. At the same time, the end of the strand must remain free.
Step 3. Separate one of the side strands and braid it into a string, securing the end with an elastic band.
Step 4. Wrap the knot with a rope, leaving the end of the pigtail free, fix the laying with the pins.

Step 5. On the other hand, separate the same strand and, twisting it into a string, once again wrap the knot out of the hair. Leave the end of the harness free.

Step 6. Fix the resulting design with pins, stealth and curl the free ends of the main rope and two ropes with a curling iron or ironing. For beauty hairstyles, it is desirable that the free ends are located at different heights. Hair a flower out of the hair can be decorated with bright accessories. The masterpiece can safely be worn by women of all ages and professions.

Second method
Another method of creating a hairstyle of a flower from hair by openwork weaving deserves our close attention.

For clarity, we present the video:
Possessing the skills of weaving an openwork braid and turning on the fantasy, you can create a lot of magnificent styling that will amaze the imagination of any fashionable woman, elevating you to the center of attention.
Hair a flower out of hair - the perfect decoration of social events, weddings, elite parties. Despite the seeming complexity and intricacy, it is created quite simply, one has only to turn to creative thinking and flight of fancy.
Rose of hair for self-fulfillment
Despite the complexity of the hairstyle, there is a simplified version of weaving, and let's begin with it.
- First you need to wash your head to dry. In the derivative place where the placement of the rosette is planned it is necessary to take the middle strand and carefully process it with foam. Before you make a rose out of hair, the rest of the head of hair can be screwed into large hair curlers (so the curls will not be too curly, but rather bulky) or tie them into a neat bunch.
- With the selected strands we begin to weave the usual pigtail of three curls. But with a significant difference: it should not be tight, and also during the weaving on one side little strands are pulled out, creating the petals of our rose.
- It is recommended that all the petals are the same. To do this, you can use additional hairspray, which will not allow the loss of excess particles.
- So, when we hit the pigtail to the end, we have one “lacy” side. Leaving it outside, it is necessary to wrap the bundle, which at the end is attached by stealth or studs to the base. Carefully straighten the petals, sprinkle with varnish and the hair of the rose from the hair is ready.
Professional hair rose
This method of creating roses is quite complicated and requires some skills. Of course, with proper dexterity, a rose from the hair, the weaving video of which is available to everyone, can also be created at home. However, most often for the "acquisition" of such hairstyles, you must contact the hairdresser.
Without a doubt: a large rose made of hair with languidly curling petals will decorate and give any woman in the right light.
Before you start weaving, it is recommended to stock up with a large number of clamps, stealth, studs and varnish. The latter will hold the entire structure. However, it is very important not to “overdo it” with its quantity, so that instead of a chic flower, a stuck lump will not turn out. It is also recommended to view the hairstyle of the rose from the hair video to determine the exact order of action.
- First, it is necessary to divide the curls into 2 parts, gathering in the tails strands with bangs and crown (first tail) and the entire back of the head and a small part of the hair from the crown (second tail).
- Then alternately dissolve and wind both tails. Separation was carried out to ensure that the hair is not confused, since the strands on the back of the head should be screwed into large curlers. And the strands on the crown are medium or even slightly smaller than the average.
- With twisted curls on the back of the head again we collect a tight tail. On the surface of the tail, choose a curl, comb it with a comb and carefully spray it with varnish. Carefully, keeping the strand smooth, we wrap it around the index finger, creating the first round of the rose. If necessary, the tip is once again wrapped around the base and secured with a clip along with a coil.
- Next, alternately separate the strands from the tail. To create a petal shape, you need to slightly pull out a part of the curls, keeping the whole strand immovable. Be sure to spray the petals with varnish to maintain their shape.
- Then repeat the manipulations, as in the first round, but now the strands are wrapped not around the index finger, but around the base of the rosette.
When the flower is ready, dismiss the upper tail and lay it gently around the rose, creating a semblance of petals. After reviewing the variations of the rose from the hair of the photo, with the styling of the curly part of the curls there will be no problems.
For a solemn occasion on the petals, you can attach stones, which will make not only your hair shine, but also you. Such wedding hairstyle with veil looks perfect.
Romantic hairstyle
- Split the entire mass of hair into two parts so that the top is a little less than the bottom.
- Divide the upper strands into two parts. One issue in the form of a French braid, picking up the strands only on top. In the process of weaving hairstyles from the hair to get the openwork effect, pull the sides.
- Dole braid, secure it with a rubber band and roll in the shape of a flower.
- A similar flower is formed from the second upper strand; place the rose a little lower than the first.
- From the right and left lower part free French braids with upper capture trudge.
- From the middle of the braids, connect them into one and dock it to the end.

A photo of a rose on the basis of a braid
Themselves with a mustache
The hairstyle of the rosette of hair is quite simple and can be performed on your own hair. Do not believe? And we will prove by offering a simple master class.
Weaving instructions:
- Divide well-combed hair into upper and lower parts.
- Decorate the upper strands into a free fishtail, gently releasing the outer edge of the braid.
- Assemble the remaining curls and braid into the tail, divide into 2 equal parts. From each part weave an openwork braid, releasing the outer strands.
- When forming roses, place the right-hand braid counterclockwise, the left - clockwise.
- Hairdo secure studs and lacquer strong hold.
The openwork weaving of flowers from the hair is truly a fascinating occupation for those who love refinement. We are sure that having tried an interesting hobby, you will be looking for more and more new horizons for creativity, and the video in this article will help you with this.
Dignity hairstyle "rosette hair"
If you want to look especially, attract the views of people around you - then this style is exactly for you!
- The hairstyle is variable, it can be constructed for both short and long hair.
- The rose from the head of hair looks really fascinating - not every day you can find such beauty.
- To create a rosette it will take quite a few tools - gum, comb, stealth and hairpins.
- If you have a desire, you can add a hairstyle with various accessories - but styling itself is an ornament, so you will not need to invent something special.
- It is easy enough to make such laying: a little skill and you will learn how to construct a real work of art.
- Laying can be done independently: as a last resort, you can ask a girlfriend for help. But most importantly - you do not have to go to expensive salons and give unrealistic amounts for laying.

Important advice from the publisher.
Stop damaging your hair with harmful shampoos!
A recent study of hair care products revealed a terrifying figure - 97% of well-known brands of shampoos spoil our hair. Check the composition of your shampoo for the presence of: sodium lauryl sulfate, sodium laureth sulfate, coco sulfate, PEG. These aggressive components destroy the hair structure, deprive the curls of color and elasticity, making them lifeless. But this is not the worst! These chemicals penetrate the blood through the pores, and are spread through the internal organs, which can cause infections or even cancer. We strongly recommends discarding such shampoos. Use only natural cosmetics. Our experts conducted a series of analyzes of sulfate-free shampoos, among which they identified the leader - the company Mulsan Cosmetic. Products meet all standards and standards of safe cosmetics. This is the only manufacturer of all-natural shampoos and balms. We recommend to visit the official website mulsan.ru. We remind you that natural cosmetics do not have a shelf life of more than one year of storage.
Create a beautiful rosette of hair: step by step instructions
You will need for styling:
- rubber bands
- hairbrush,
- fixing mousse,
- spray lock,
- curling iron or styler
- hairpin-clip,
- invisible,
- studs.
As soon as you prepare everything you need, you can start laying.
- Select one strand from the left side.
- Using a rubber band, fix the tail. It should be quite tight, because the whole structure will nest on it.

Now came the turn of curling: wind the remaining hair. The size of the curling does not matter - the most important thing is to get elastic curls. In order to curls do not break, process them fixing spray.


The resulting strands must be separated. Each coil twist in a tight harness, after which they will need to stretch. Hold the end of the strand with one hand, and the second gradually pull the hair. Thanks to this technique you should get a pile.


Lift the entire mane up and smooth it out using a comb with sparse teeth. You can not carefully comb the hair so as not to spoil the curls. Secure the hair at the bottom of the clip.


Since this installation is rather complicated, we recommend that you familiarize yourself with the video tutorial: this way you can clearly understand how to twist the petals and avoid mistakes when creating a rosette. The video also shows how to make a rose without twirling curls:
Tip from a stylist: If you already have enough experience, you can try to make a few roses, but small sizes on the same principle. However, it should be noted that all the flowers should be the same size - in this case, the hair will look harmonious.

Magnificent rose from your own hair: learn to create beautiful things with your own hands
This hairstyle is suitable even for a wedding image - provided that you do it correctly. And in order for everything to work out - you just need to follow the recommendations below. Prepare in advance all the necessary styling:
- decorative hairpin (if desired),
- clamp that
- elastic,
- hairbrush,
- fixing spray,
- invisible.
Getting to the creation of roses from their own hair:
- Pick up hair, braid tail. It will need to be fixed with an elastic band - the tighter, the better, since it is on this tail that the future rosette will be constructed.

Important advice: all hairpins need to be inserted into the hair only in a zigzag manner. Direction - the center of the tail.
The strand must be wound until it is finished. Each turn is necessarily fastened with a hairpin - otherwise the hairstyle may break up at the most inopportune moment.


In the end, this is the beauty that you should have. Let's just say: make hair is not difficult. You will need only a little skill, as well as patience.The most important thing is to follow all the steps consistently, and the petals must be identical to each other, otherwise the styling will look untidy.
Tip from the stylist: If you want to create a truly unusual hairstyle, use colored hairspray. So, you can paint your rose in any color that will be in harmony with the outfit. This is especially true at weddings - if the newlyweds decide to make a wedding in a certain color scheme.

Watch the video - in order to build an impeccable rosette of hair:
The option for every day: sweet roses with weaving
This hairstyle can be done at least every day - it will take a little time to create the styling - up to 30 minutes, but the end result looks very cute and unusual. Get ready for increased attention - surely such a layout will interest your friends and girlfriends.
- Wash, dry and comb your hair thoroughly.
- Separate the hair at the top of the head - as if you are going to make malvinku. Fasten the hair with a clip - we need it to create a flower.
- Those hairs that have remained free need to be curled - for convenience, you can use a styler, if there is no such device on hand - an ordinary curling iron will do.
- Apply varnish on the resulting curls.
- Carefully separate and fluff the curls so as to give them volume.
- Now we proceed to the creation of the rose itself.
- Remove the gum from the top strand.
- We start to weave a pigtail - there should be two of them, and both on the sides.
- Once you get to the middle, fasten the pigtails with a silicone rubber band.
- Now you need to braid one braid. The resulting strand is divided into three equal parts and weave a classic pigtail.
- In order to make it look more lush, step by step, gently pull strands, but try not to overdo it.
- The resulting pigtail must be wrapped several times at the base - so that you get a small flower.
- Secure hair invisible - so that it does not fall apart.
- At the end, apply a styling spray - so you will be sure that the hairstyle will last a long time.
The peculiarity of this styling is that it is perfect for any outfit - be it a long skirt, or jeans with a blouse. In general, initially, such hairstyles were very popular among hippies - but over time, similar hairstyles were loved by young girls who just want to look original and stylish.

In order to build a beautiful rosette of hair, it is not at all necessary to have a long, luxurious head of hair. This styling will look lovely on medium-length hair. Hair can be done even on a car - just keep in mind that the rosette in this case should be smaller.
The peculiarity of laying is that it can be both solemn and festive, as well as everyday. You can build a hairstyle yourself - just have patience and follow the described instructions clearly. Even if you don’t quite get to master the technique from the first time, try again and again, and as a result you will be able to create an impeccable styling that even experienced professionals would envy.
How to make a rose out of hair: photo step by step
Hairstyle is performed on clean and well-combed hair. What you need to create hairstyles:
- Scrunchy,
- Hairpins, clips,
- Hairbrush,
- Lacquer strong fixation
- Studs
- Jewelry (decorative stud),
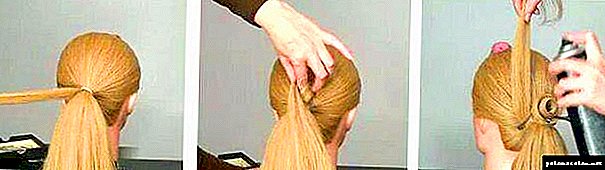
- Braid the tail, as shown in the photo. Secure with a tight rubber band. Peel off a small amount on top of the tail, put the base on it, treat it with hair spray and comb it. The strand should be slightly damp and varnish smooth.
- Fold the base around your finger and place it in a beautiful curl, forming the center of the rose. Secure the curl first with a clip and then a hairpin. All studs are inserted in zigzag movements to the center of the tail.
- Continue to wrap this strand around the middle, fixing the bends with hairpins. Try to lay a strand gently, periodically sprinkling it with varnish. It should be flat. The end of the strand fix the stud.
- Again, from the bottom, separate another strand of the same thickness. Well comb it and sprinkle varnish. Petal is placed from left to right. With a hairpin-clip, pin up the base of the strand so that the strand is flat and parallel to the head. With this one strand we form one large petal, just wrap the tip around the base, hide it and fix it with a hairpin.
- From the bottom to the left, we again separate the strand, comb it, treat with hairspray. Again, pin up the hairpin at the very base and form a new rose petal, wrap the tip around the base and fasten it with a hairpin. Ready-made petal locks fix with varnish. First, we put half of the tail strands in the petals on the left side.
- After the flower of the hair became lush from the left side. Do the same steps on the right side. Separate the new strand on the right, combing, splashing varnish, combing again and forming a petal, clamping with a barrette. The tip is also wrapped around the base and fastened with a pin.

- We continue to separate the new strands on the right side and lay them in the petals in the same way.


In conclusion, the rose itself can be decorated with a decorative, sparkling hairpin. The finished hairstyle is treated again with a strong hold lacquer. Rose of hair is ready!

Hairstyles with a rose out of hair: photo
These are the wonderful evening styling can be performed on the basis of such a rose. Very beautiful!


Have you tried to do such an elegant styling? Share in the comments!